Quality managers and engineers collaborate on a production line. A well-crafted quality inspection checklist serves as a guide to ensure every product meets standards before it ships. One of the most effective tools to prevent quality issues is a quality inspection checklist.
What Is a Quality Inspection Checklist and Why Does It Matter?
A quality inspection checklist (also known as a QC checklist or inspection criteria sheet) is a written guide that quality inspectors use to evaluate products before they leave the factory.
It typically includes a detailed list of criteria covering the product’s appearance, functionality, dimensions, weight, materials, workmanship, labeling, packaging, and any special customer requirements. Essentially, it’s the go-to reference for what “good quality” means for a specific product.
For example, a checklist for an apparel product might list acceptable measurements tolerances, stitching quality criteria, fabric color standards, packaging instructions, and so on – all in one document.
Why does this matter?
Because without a checklist, each inspector might interpret the product requirements differently or overlook important details. A well-defined QC checklist makes the inspection process consistent and repeatable, no matter who performs it or at which factory.
It ensures that nothing critical is missed during an audit. By clearly stating each checkpoint and the pass/fail criteria, the checklist removes ambiguity. This means fewer mistakes and miscommunications, both on the production floor and between you and your suppliers.
It also serves as a mutual agreement on quality: your suppliers know exactly what standards they need to meet, and your inspectors have a clear mandate on what to verify.
In industries with strict safety or regulatory standards, the checklist is indispensable – it provides documented evidence that all required checks (for safety markings, certifications, etc.) were completed and passed.
How to Create a Quality Inspection Checklist
Creating an effective quality control checklist involves careful planning and input from various stakeholders. The goal is to craft a checklist that is comprehensive enough to catch issues, yet clear and user-friendly so that inspectors can easily follow it on the factory floor.
Below are the detailed steps to create a QC checklist, along with best practices for each step:
1. Define the Product Requirements and Standards
Start by gathering all product specifications and requirements. Work with your engineering, product design, or merchandising team to list out the exact specs the product must meet.
This includes the critical measurements, materials or components to be used, color and finish requirements, and any performance standards. Make sure to incorporate any regulatory or industry standards that apply.
For instance, if the product must comply with a safety standard (like CE, FCC, or FDA regulations), note those specific requirements in the checklist.
2. Organise the Inspection Workflow in Logical Order
Think about how the inspection will physically take place and structure the checklist accordingly. A logical flow helps the inspector move through the process efficiently without missing anything. One common approach is to follow the order in which a product is unpacked and checked:
- Packaging and labeling checks: Begin with the outer carton condition and labeling, then the inner packaging materials, barcodes, and any user manuals or inserts.
- Product exterior and appearance: Once the item is unpacked, inspect the external surfaces for cosmetic defects (scratches, dents, color consistency, logo placement).
- Functional and assembly checks: Next, test the product’s functionality (moving parts, electronics, fitting of pieces) and verify assembly quality.
- Measurements and weight: Then, use tools like calipers, measuring tape, or scales to check critical dimensions and weight against specs.
- Internal components (if accessible): If applicable, inspect the inside (for example, the wiring of an electronic device or stitching quality inside a garment).
- Final packaging and accessories: Finally, verify that all accessories, documentation, and packaging elements are present and correctly placed before re-packing.
Mirroring the actual inspection sequence in the checklist ensures nothing is overlooked. It also makes the checklist intuitive – inspectors can walk through the process step-by-step, following the same order they would naturally check the product. This reduces confusion and saves time.
3. Break Down Criteria by Category (Appearance, Function, etc.)
Divide the checklist into sections or categories that cover different aspects of quality. This makes the document easier to navigate.
Common categories include:
- Materials & Components: List the required materials, parts, or ingredients. For each, specify what to verify (e.g. type of material, grade, certification, etc.).
- Workmanship & Appearance: Define what to look for on the product’s surfaces and construction. For example, “no scratches deeper than X mm on surfaces,” “edges should be smooth,” “seams must be straight with no loose threads,” or “paint color must match the approved sample.”
- Dimensions & Fit: Include the key measurements with their tolerances (e.g. length = 50.0 cm ± 2 cm). If parts must fit together, note any fit tests (like two pieces should snap together firmly).
- Functionality & Performance: List all functional tests the product should pass. For instance, if it’s an electronic, tests like powering on, checking all buttons, verifying output voltage, etc. If it’s a garment, perhaps a stretch test on a fabric or a fit check on a mannequin.
- Safety & Regulatory Checks: Highlight any safety-related items, such as sharp edge checks, proper warnings labels, certifications, or specific tests.
- Packaging & Labeling: Detail what to check for packaging. This can include artwork correctness, label information (SKU, barcodes, address, etc.), packaging dimensions, and drop test requirements if any.
- Accessories & Count: If the product comes with accessories or multiple parts, list them and ensure the checklist has the inspector confirm the quantity and quality of each piece (e.g. “2 screws and 1 wrench included in each box”).
By grouping related checkpoints under clear category headers, you make it easy to ensure each aspect of the product gets attention. The inspector can systematically go through each category without jumping back and forth. It also helps subject-matter experts to review that portion of the checklist for completeness.
4. Specify Detailed Checkpoints and Quality Criteria
For each item on your checklist, describe exactly how to perform the check and what the pass/fail criteria are. You want to remove any subjectivity or ambiguity from the inspection process.
Some best practices:
- Use measurable thresholds whenever possible. For example, instead of saying “Verify the product is not damaged,” say “No cracks or chips visible on the surface; no deformations beyond 2 mm.” Instead of “Check barcode,” specify “Scan barcode with a standard scanner — it must match the SKU and be scannable in one try”.
- Define defect classifications if you use them. Many companies categorize defects as critical, major, or minor. If so, note what type of issues fall under each category. For instance, a missing safety warning might be critical (cause for automatic rejection), a small paint scratch might be minor (within acceptable limits if few in number). Clearly stating this in the checklist helps the inspector know how serious a given defect is.
- Include photos or diagrams for reference when possible. A picture of an acceptable vs. unacceptable example can be worth a thousand words. For instance, if you mention “scratch longer than 2cm is a fail”, a photo illustrating how to measure the scratch on a sample can ensure the inspector interprets it correctly.
- Outline the tools or instruments required for each check, if not obvious. If a step requires a multimeter, a color swatch, a tension gauge, or any specific tool, list it next to that checkpoint. This way the inspector can prepare all necessary equipment beforehand.
The key is to make each checkpoint so clear that two different people would likely reach the same conclusion about a product’s status by following the checklist. When quality criteria are explicit, you avoid debates like “I think this is good enough” vs. “I don’t” – the checklist definitions make the decision for you.
5. Determine Sampling Plan and Testing Methodology
Quality inspections often involve sampling, especially if you have a large batch of products. In your checklist, indicate how many units should be checked for each test or inspection point.
For example, if you have 500 units in a lot, you might inspect the appearance of 80 units (per an Acceptable Quality Level standard), measure dimensions on 5 units, and perform full functionality tests on 10 units.
If you’re using a standard like ISO 2859-1 (AQL) for sampling, note the AQL level and sample size for reference. Being clear about sample size helps inspectors know how thorough to be and ensures consistency between different inspection sessions.
Also, describe the testing methods for any functional or lab tests. List any equipment needed: e.g., “Use a calibrated torque wrench to test the screw at 5 Nm” or “Need a digital scale (accuracy ±0.01 kg) to verify weight.” Don’t assume the factory or inspector will have everything – explicitly note who should provide the tool if it’s special.
6. Make the Checklist Easy to Use
An effective checklist is user-friendly. Use a clear format that is easy to read on the shop floor.
This often means:
- Bullet points or numbered steps (avoid long paragraphs of text).
- A clean table layout for recording measurements or results, if applicable.
- Simple language, avoiding jargon that inspectors or factory staff might not understand. If technical terms are needed, consider adding a brief explanation or ensure the inspector is trained on them.
- Translate the checklist if needed. If your inspector or supplier’s staff speak a different language (e.g., Chinese, Vietnamese, Spanish), providing the checklist in that language (or bilingual) can dramatically reduce misunderstandings.
- Highlight critical checkpoints (you might mark them with asterisks or in bold) so they stand out. For instance, if a particular safety test is absolutely crucial, make it visibly distinct.
- Keep the checklist as concise as possible without omitting important details.
Remember, the people using this checklist might be doing so in a noisy, busy factory environment, possibly under time pressure. So clarity and brevity help.
7. Involve the Team and Suppliers in Review
Before finalizing the checklist, get feedback from all stakeholders. This includes your internal team and, importantly, your supplier or manufacturer. Why? Because each of these perspectives can catch something you missed:
- Your engineering or design team can verify that all critical specs and features are covered.
- Production supervisors might point out if a certain check is impractical the way it’s described, or suggest a better way to verify a feature.
- Suppliers can confirm if the criteria are reasonable and clear. In fact, involving the supplier early on fosters buy-in – they see that the checklist is fair and based on your genuine requirements, not arbitrary. This collaboration can improve trust and communication.
- If you use third-party inspectors, consider their input as well. Experienced inspectors can offer practical suggestions.
Review every item and ask, “Is this checkpoint clear and necessary?” Remove or refine anything that doesn’t pass that test. By developing the checklist collaboratively, you ensure it’s comprehensive and also agreed upon by everyone involved in quality control. This prevents conflicts later – for instance, a supplier is less likely to dispute an inspection result if they helped define the criteria in the first place.
8. Test the Checklist and Refine It Over Time
Once you have a draft checklist, do a trial run. You can perform a mock inspection on a few products (or the first articles off the production line) using the checklist as if you were the inspector.
This trial run often reveals gaps or confusing items. It’s much better to adjust now than when you’re in the middle of a mass production inspection.
After testing, finalize the first version of your checklist and start using it for actual inspections. But don’t consider it set in stone. A quality inspection checklist should be a living document. Over time, you will likely identify ways to improve it.
- If inspectors repeatedly find a certain defect not listed, you’ll want to add that to the checklist criteria.
- If a checkpoint always passes without any issues across many inspections, maybe it’s not needed or can be simplified.
- When product designs change or new regulations kick in, update the checklist accordingly.
- Also, gather input after each inspection cycle. Maybe your inspectors or suppliers will have suggestions once they’ve used it in the real world.
Benefits of Using a Quality Control Checklist
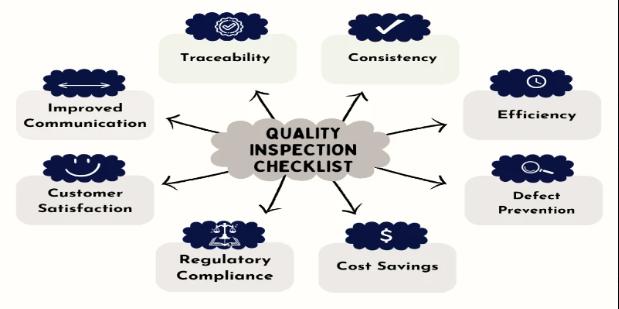
Implementing a quality inspection checklist yields numerous benefits for manufacturers and suppliers. It’s not just about catching defects – it also improves your overall process and business outcomes.



 December 31,2025